I love this Hero Art Chocolate Chip Cookie stamp, My Minds Eye Pretty Please Pocket card and matching clip stand. I used a large book binding clip cover with matching paper add gems and ribbons - great for displaying your favourite card. For the card I cut a strip of card folded it into 3, cut of a piece diagonally from each end from fold to corner. Punch some holes down one side, added some ribbon, stuck one end over the other and along bottom to make a pocket. Stamp and emboss cookie recipe onto white cardstock, added ribbon to a mini clip and attached to the top - slide into pocket!!
Monday 29 June 2009
Chocolate Chip Cookie Card
I love this Hero Art Chocolate Chip Cookie stamp, My Minds Eye Pretty Please Pocket card and matching clip stand. I used a large book binding clip cover with matching paper add gems and ribbons - great for displaying your favourite card. For the card I cut a strip of card folded it into 3, cut of a piece diagonally from each end from fold to corner. Punch some holes down one side, added some ribbon, stuck one end over the other and along bottom to make a pocket. Stamp and emboss cookie recipe onto white cardstock, added ribbon to a mini clip and attached to the top - slide into pocket!!
Sunday 28 June 2009
Birthday Dreams
 Using a 3" scallop punch I cut out a circle, tinted it with chalks and inked the edges, I then stamped and embossed the message and of course added a gem. I punched the edge of a piece of bazzill with Fiskars scalloped lace punch and added some ribbon. I layered the In my Minds Eye Pretty Please cardstock and attached the above. This was one of my cards I did for a demo day at The Gltterpot.
Wednesday 24 June 2009
In Bloom!
 I made this card with My Minds Eye In Bloom collection paper, A Whale of a Punch retro flower (medium size), Ek Success tiny flower power punch, mould the flowers before attaching to the card. Add some mint green liquid pearls and a button to the centre of the punched flowers. I used a 4" x4" white card blank for this tiny card. (All materials used are from www.thegliterpot.co.uk
Tuesday 23 June 2009
Crowning Glory

I made this pretty card using Woodware Fingerguard trimmer and the pinking blade, a 2.5" woodware scallop punch. Hero Arts Swirly Crown stamp, My Minds Eye Pretty Please papers, Doodlebug gems and Pebbles pearlescent chalks and some pretty sheer ribbon. Hey Presto a simple little card.
Saturday 20 June 2009
Mousy Birthday
 I love this cute mouse stamp from Penny Black, here I used Cheesecake Wishes and also the new Hero Art Design Block Special Day Words stamp. The cardstock is My Minds Eye Bloom. I added a Painterly Petals Dude flower, a button and some Doodlebug jewels.
Friday 19 June 2009
Oh Scallops!!

 I made these cards using several sizes of scallop circle punches from Woodware from 1.5 to 3 inches. I also used a whale of a punch retro flower. The stamp is from Hobby Art and the papers are from Cosmo Cricket Girl Friday. Add some sheer ribbon and Poinsietta Dew Drops.
Wednesday 17 June 2009
Mindy's Flowers


I was so pleased when I was asked if I'd like to do some classes for The Glitterpot, so here are some more cards from my class last week. I used Autumn Leaves Mindy's Flowers clear stamp set and Pebbles papers - cutting them at wacky angles. I coloured the flowers using ink pads and a blender pen. And of course I just had to add some glitter and ribbon.
An Explosion of Flowers


This was such a fun card to do, it was a class I taught a few weeks ago. Lots of folding, lots of punching and lots of mess! but a fab result - hope you like it too!!
Thursday 23 April 2009
Good Enough To Eat!!
 I've used the 'Close to Cocoa' prints range from Stampin Up and cut them at whacky angles. I used the spiral punch down one side of the brown cardstock and attached Bazill brown pom poms to another. I then punched out a scallop circle and added a Craftwork Cards chocolate circle message to the centre - good enough to eat!
Wednesday 22 April 2009
Chocolate Challenge
 Items use : Stampin Up brown cardstock/close to cocoa prints
Scallop circle punch
Circle punch
Bazzill brown tulle
Adhesive pearls
Craftwork Cards circle message
Wednesday 15 April 2009
Birthday
 My inspiration for this card came from the spotty flower. I've used BasicGrey papers in browns and blues, Craftwork Cards circle messages, buttons and a spotty flower. Cut a strip of brown 3 x 14.4 cms and attach to card. Cut two scallop ovals from Nestabilities, again attach to card. Add a pretty flower, some buttons and a message. Round the corners of the card and hey presto!
Tuesday 14 April 2009
A Binding Moment!!

I used 5 cms binding clips (available from any stationers) to make these tiny stands - great for displaying your precious photos or your favourite cards (they look great if you colour co-ordinate them). Just cut 2 strips of patterned cardstock or paper and stick to the clip using double sided tape. Add some pretty ribbons, flowers and buttons.


Monday 30 March 2009
Cupcake heaven

 I've made these cards using Hero Arts Cupcake clear stamp set. Some pretty ribbons and doodlebug papers, Pebbles rub- ons and Craftwork cards birthday circles. On the second card I stamped the image onto vellum to make it look like the actual cake case. I added glitter glue for a bit of sparkle.
Sunday 29 March 2009
Piglet Power!!
 I've used some pretty papers from the Stampin' Up range. I cut out Cuttlekid Pig using pink velvet paper and black cardstock.. I added a Craftwork Card birthday circle to the centre of a Heidi Swapp plasma flower. I've attached 3 Poinsietta Dew Drops from Robin's Nest using glossing accents.
Cute Kitty!
 I love this stamp from Wild Rose Studio called Cat in Tree. I've stamped the image several times and 3D it. I added punched out flowers and liquid pearls to the centre of the flowers. I then mounted it onto orange co'rdinations cardstock then onto white and used Pebbles Basics orange flower/dot cardstock attached to white base card.
Thursday 26 March 2009
12" x 12" Acetate Pages

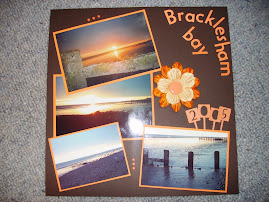
 These are some fun and unusual pages I did using acetate. Just treat it the same as any scrap layout. The golf page is just the flip side of Jamie - the pages look like they're floating. Cut layering mats the same size for both sides - that way you won't see any edges from the other. Attach to acetate using your usual means of adhesion.
Just a few pages!!


 Here's just a few of the scrap pages I did on my Crop Weekend. Yep another trip to Bognor Regis with friends, we had a great weekend - did'nt manage to do quite as many pages this year, but still had fun!! Stay tuned for more pages coming soon!
Saturday 21 March 2009
Daisy & Dandelion

 These new Bubbles & Squeak and Candyfloss & Marshmallow die cut decoupage kits by Daisy & Dandelion are just so cute. Their quick and simple to do and their waiting at www.theglitterpot.co.uk for a new home!!
Tuesday 24 February 2009
Its'a Snap

Here's my son Scott on our Trip to Boggy Creek. I used yet again co-ordinations cardstock in different shades of beiges (as you can probably tell I'm a great fan of this cardstock). I used two different sizes of Woodware 'Monstera' punches and chalked the edges with a shade of green. The Titling was cut from Cricut.
Purple Passion


Both of these cards were made using the new Hero Arts 'All Occasion' and 'Printed Flowers' clear sets, matt and layered onto co-ordinations cardstock and coloured using Pebbles chalks. www.theglitterpot.co.uk
A Pretty Silhouette

Stamp and emboss image using the new Hero Art Design Block Silhouette stamp. Add some gems and sequins glitter glue to some flowers and punch the centres out of some of the other, mount onto feather boa and black tie cardstock. Add sheer ribbon along the bottom edge and attach to card. Stamp a message from Hero Art 'All Occasion' clear set, layer and attach to bottom left of image. www.theglitterpot.co.uk
Burst of Stars

Using the Penny Black Burst of Stars stamp and emboss onto white cardstock. Mat and layer onto bazzill bling black tie and feather boa. Stamp and emboss image onto two pieces of black tie and layer onto feather boa. Place one piece across centre. Punch two holes into the other piece and tie with sheer ribbon. attach to card. Add gems and 'sequins' glitter glue to image. Add pink gems to lower right of card. Stamp and emboss message from the new Hero Art 'All Occasion' clear set, again matt and layer onto black tie and feather boa, attach to card. www.theglitterpot.co.uk
Thursday 19 February 2009
Canvas

As an alternative to a scrap page why not try a canvas. This is my daughter Claire.
Paint canvas with acrylic or poster paint, using double sided tape add some pretty papers. Distress the edges with ink, add a fab photo and embellesh. Being a wood frame its great to add ribbons with a stapler. Use a mini easil to display your artwork. Treat it like you would a scrapbook page.
Wednesday 18 February 2009
Just a Tin


As an alternative to a gift bag, why not make a gift tin. Just use a paint tin and cover with some lovely papers and embellesh with flowers, tags, ribbons, buttons - what ever really - I just stuck it on with double sided tape. Why not decorated it to colour co-ordinate with their own colour scheme in their house!!
All Zipped Up!

Take a 4 inch zip, make a template and cut out a 'Y' shape, transfer to doodlebug filigree paper and attach zip with double sided tape, attach to a 6 inch blank card, chalk all edges. Using Doodlebug Halloween sticker sheet, decorate two tags, ink edges and add glossy accents. Cut out a flower, attach to card with 3D foam pads. Add doodlebug black stitching around zip.
Get Well Soon

Here I used the Smirks 'Nice' decoupage kit, Doodlebug paper, pink Tulle, some glitter glue, glossy accents and rub ons.
SMIRKS


I really like the new Smirk stamps from Trimcraft. I used Naughty & Nice Clear stamp set for both these cards - these stamps are fun and girly!!
Monday 16 February 2009
forever friends

Stamp and emboss forever friends image and penny black Shoes & friends. Using double sided adhesive sheet cover image, peel off top layer and sprinkle with Art Institue glitter. Layer onto pink and bazzill black swiss dots cardstock. Punch a coule of holes into top right of one piece and tie with ribbons. Add a couple of bubblegum gems.
Sunday 15 February 2009
My Special Day
Well finally reached that big 50, not so bad really!! I had some excellent pressies and was well spoilt. Celebrated the day with a surprise family dinner - good food and great company. But the best was yet to come - Hubby treated me to a Spa weekend. I had a fantastic weekend with my daughters Claire & Lisa at Alexander House in Turners Hill. It was absolutely brill! Pampered and waited on all weekend. If you ever need to recharge your batteries then this really is the place to go - trust me! Can't wait till the next big one!!
craftypiglet
 Well anyone that knows me knows that this stamp was a must have! Penny Black 'Oink'.
I stamped and embossed the image three times so that I could decoupage Pig. Coloured with twinkling H2O's, added diamond glaze to nose and gems to centre of flowers. Layer onto pink cardstock. Stick Doodlebug paisley paper to white cardstock, stick to another piece of pink cardstock at a whacky angle, tie pink tulle around and stick to base card, then add 'oink' image. Add a couple of self adhesive pearls to paisley paper.
Shoes & Friends - you can never have too many!
 Stamp and emboss Hero Art High Heel shoes clear stamps and Penny Black message stamp. Cut out shoes and embellesh with 'sequins' Glitz It Glitter Glue, sheer ribbon and gems. Round right hand corners of base card, then cut two pieces of purple co-ordination cardstock. round corners and punch three holes to corner of each piece, attach to black cardstock and stick to card. Attach shoes using 3D foam pads, mat and layer message - rounding corners as you go, attach to card. Add small flower with gems in the centre.
IT'S A GIRL THING
 I used the new Hero Art Clear Stamp set 'High Heels' and co-ordinations cardstock for this one. Cut 3 strips of purple co-ord. cardstock and stick to card. Stamp and emboss shoe and message. Layer onto more purple. Punch a couple of holes top right of shoe image and tie with sheer ribbon. Add gem and tie sheer ribbon to paper clip - attach to message. Adhere both pieces to card. Add glitter glue to shoe and 2 gems to top right of card.
I'M BACK (no pun intended!)
 Hi guys and gals, yep I know it's been a while (yet again!), but I'm back at last Tracy!!
This was my lovely card sent to me whilst I've been off with bad back - new I should'nt have made that joke about the zimmer frame, ha ha!! Love the new Penny Black stamps, this one's called 'Playtime'.
Subscribe to:
Posts (Atom)


.jpg)